Adding Sign-in with Apple into your WHMCS for customers is a three-step process:-
Step 1:SETUP ACCOUNT WITH APPLE DEVELOPERS AND ACQUIRING API CREDENTIALS
Create a Developer account with apple developers here https://developer.apple.com/ or if you already have an account, log into your Apple developer account
We will need to obtain an App Id with “Sign In with Apple” capabilities.
- Go to Certificates, Identifiers & Profiles > Identifiers and click on the + sign in the upper left next to “Identifiers”.
- Select App IDs andhit continue.
- Here enter any Description and a Bundle ID (Apple recommends using a reverse-domain name style string ex: com.domainname.appname). Scroll down the Capabilities and make sure to tick on Sign In with Apple. And finally, click continue, and on the next page verify the details and click Register.
- Note the App ID Prefix (Team id) will be needed when configuring the module
Now we need to obtain a Services Id. This will also serve as the cliend_id when you will be making API calls to authenticate the user.
- Again go to Certificates, Identifiers & Profiles > Identifiers, and click on the + sign in the upper left next to “Identifiers”.
- This time select Services IDs andhit continue.
- Here enter any Description and an Identifier (Apple recommends using a reverse-domain name style string ex: com.domainname.appname). Make sure to tick on Sign In with Apple. Here you will have to click on the Configure button next to “Sign In with Apple”.
- Clicking the Configure button from the previous step will display a screen with Web Authentication Configuration. Make sure the App ID we obtained previously is selected as the Primary App ID. Next, you will have to add the Web Domain you will be using this service in (however I did not have to verify the domain to try out Sign In with Apple, but it’s best if you can get this done). I used example-app.com. Finally, add the Return URLs (you can add multiple) which will be the valid URLs to redirect the user after the user authenticates with Sign In with Apple (for quick testing purposes I used https://example-app.com/redirect). Click Save.
- Note the redirect URI, will be needed when configuring the module
- Click on Continue and the next page verify the details and click Register.
Now we need to create a secret key that will be used to get our client_secret which will also be needed to make a token request from Apple.
- Go to Certificates, Identifiers & Profiles > Keys, and click on the + sign in the upper left next to “Keys”.
- Give a Key Name and make sure to tick Sign In with Apple. Here also we will have to click on Configure. And in the screen that appears next(Configure Key) select the same App Id we used previously under Choose a Primary App ID and click Save.
- Click on Continue and the next page verify the details and click Register.
- Download the key and keep it in a safe place as you will never be able to download it again. Click on Done after downloading the key.
Well, that’s pretty much it with configurations, now that we have all the required credentials to use during the setup of our module, we move to step 2
Step 2:Uploading and configuring Module to WHMCS
1.After downloading the module, upload it to your WHMCS/modules/addons directory.
2.Also, upload the downloaded key file somewhere safe in your directory and copy the full path to the file for use while configuring the module.
3.After uploading the required files, now go to your WHMCS admin under Setup >Addon Modules and on the list, you should see the Sign in with Apple module, click the Activate button and enter the following required fields:
a)client_id: Your Services ID, e.g. com.example.services that you created in STEP 1
b)keyid: you can find it in your apple developer account under Certificates, Identifiers & Profiles > Keys and choose the key created in STEP 1
c)key file location: Paste the path to the key file you uploaded to the server in STEP 2:2
d)teamid: the team id acquired in the previous STEP 1
e)redirect Uri: the redirect Uri you registered in STEP 1
and on Access Control choose Full administrator role, Click save changes, and it’s done.
STEP 3:EDIT linkedaccounts.tpl FILE
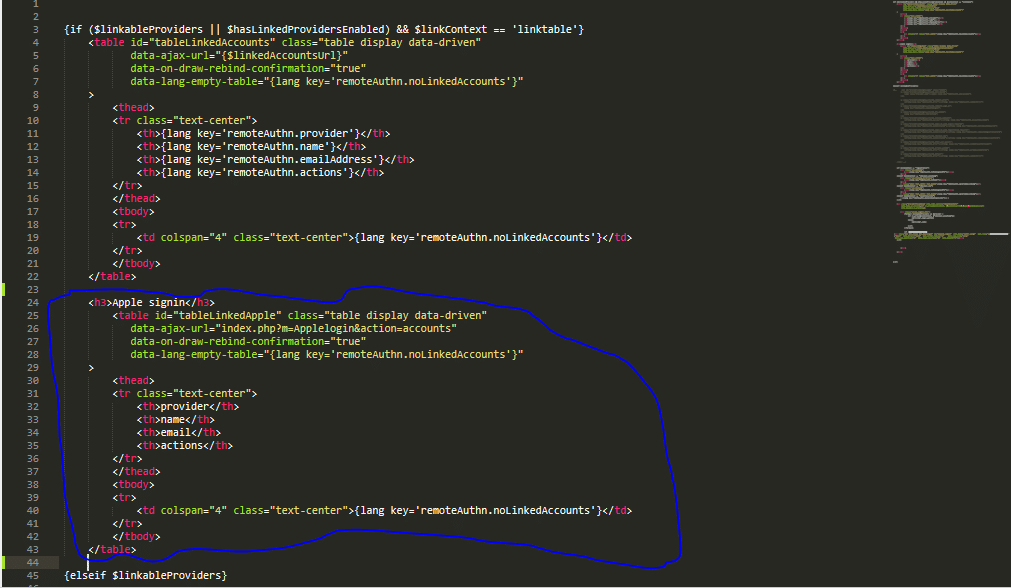
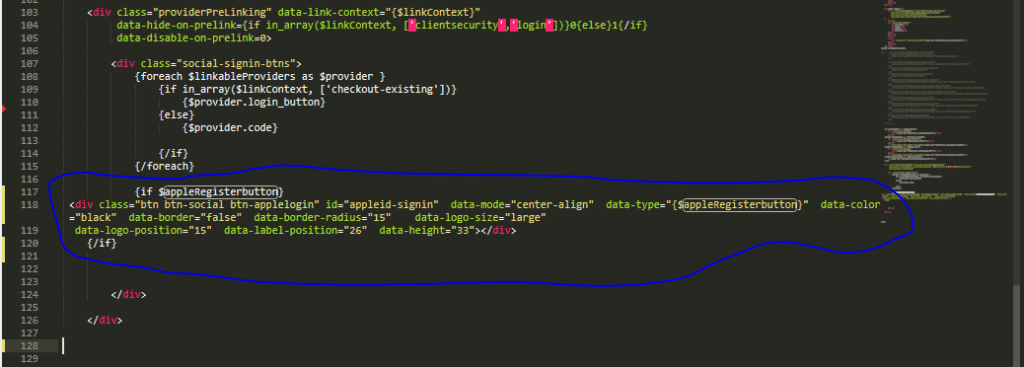
Find linkedaccounts.tpl file in WHMCS <root>/templates/{$template}/includes/linkedaccounts.tpl and edit,add the following code respectevely after the original as hightlighted in the screenshots.
1.Add a Table for apple accounts

<h3>Apple signin</h3>
<table id=”tableLinkedApple” class=”table display data-driven”
data-ajax-url=”index.php?m=Applelogin&action=accounts”
data-on-draw-rebind-confirmation=”true”
data-lang-empty-table=”{lang key=’remoteAuthn.noLinkedAccounts’}”
>
<thead>
<tr class=”text-center”>
<th>provider</th>
<th>name</th>
<th>email</th>
<th>actions</th>
</tr>
</thead>
<tbody>
<tr>
<td colspan=”4″ class=”text-center”>{lang key=’remoteAuthn.noLinkedAccounts’}</td>
</tr>
</tbody>
</table>
2.Add a button for apple sign in/sign up/continue

{if $appleRegisterbutton}
<div class=”btn btn-social btn-applelogin” id=”appleid-signin” data-mode=”center-align” data-type=”{$appleRegisterbutton}” data-color=”black” data-border=”false” data-border-radius=”15″ data-logo-size=”large”
data-logo-position=”15″ data-label-position=”26″ data-height=”33″></div>
{/if}
Save and upload the file to your WHMCS server.


